Knife Build #1
Let me start out by saying there are far better ways to do things than what I am going show here. Knife making like most other things can be as simple or as complicated as you want to make it. This time its going to be simple. I want to demonstrate the fact that you can build a good working tool for little or no money.
A knife is without question the most important tool you will need in any survival situation. I don't know about you but I don't want to have my life depend on some garbage five dollar knife made in China, especially when you can make a great knife on the cheap out of an old file with household tools.
Files are made from high carbon steel and make excellent blade material. I picked one up at a yard sale for a quarter so that is what we will be working with. This file is a
Simonds. I don't know much about the company but I looked them up and they seem pretty reputable to me. I do know that Nicholson files are made out of 1095 high carbon steel and I can't see any reason this one would be any different.
 |
Here the teeth are ground most of the way off. This particular file was heavily rusted so I wanted to see how deep the pits were before I went further. You can skip this part until after you anneal the steel if you want.
|
 |
| whole file with a rough sketch |
 |
| Closer view |
At this point the file is very hard and brittle so we will need to soften it before we start work on shaping the blade. This process is called annealing. In a perfect world I would use a forge for this but I don't have it set up right now so we will be using a wood fire for the annealing process. I didn't realize until it was too late but my camera battery was dead so no action pics of the actual fire. I got the fire going until I had a nice bed of coals and buried the file down in them . I used an air compressor and blasted the coals with air to simulate a forge blower. I wouldn't recommend anyone else do this since its probably very dangerous. It was making my welding gloves smoke from over 3 feet away from the coal bed and I got a hot one down the cuff of my glove so now I have another pay attention stupid mark on my arm. Give it a try if you want but don't say I didn't warn you if you get burnt. It worked like a champ. I could see the file down in the coals glowing nicely.
The idea is to heat steel the and let it cool slowly. Let fire burn out and cool naturally,
There is a ton of information out there be had about the rocket science of metallurgy and what heat does to steel and how to do it properly but for our purposes this will work just fine. so the fire is going and blade is buried in the coals so nothing to do with it but wait.
 |
| The fire pit post burn |
 |
| here is the file I unburried from the cooled ashes |
 |
| As you can see the there is a slight warp no problem it straightened right out with a few love taps |
 |
| Initial shaping started here with a rough sketch |
 |
| close to final shape I didn't much like the knob on the end so i removed it. |
 |
| Final shape with the pin holes drilled for the scales the and a close to mirror finish. The handle scales are below I will talk more about those in a bit |
The blade shape was not how I intended it to turn out. It sort of just turned into what it is after correcting a few mistakes in the grind. It should be a great small game or fine carving tool all the same.
I wont go into a lot of detail on the actual shaping of the blade its all pretty much common sense. I used a combination of the belt sander, 4 1/2 inch grinder and files to shape it. I polished the blade with sand paper starting with 220 grit and dropping down in grit coarseness to 1500 until I got a nice polish. The only thing left to do as far as the blade itself is the heat treat, temper and final polish. I am waiting on the heat treat until I have a few more blades I'm working on ready.
In the mean time we can talk about handle material. There are many good materials for handles. Natural material like bone, antler and wood to man made material like canvas micarta or laminated woods such as diamond wood. We are going to use wood I am using madrone but any hardwood you can get will work.
 |
| This is not the tree I used. Just an image I pulled off the net to show you what it looks like |
I found a small tree(about 4"in diameter) up near the house. Not that I really care but for any tree huggers out there this particular tree was already well on its way to being dead. I chose it because something was killing it and that can often lead to some cool grain pattern or unusual color.
I used a band saw and slabbed out a few pieces to see what I had to work with.
 |
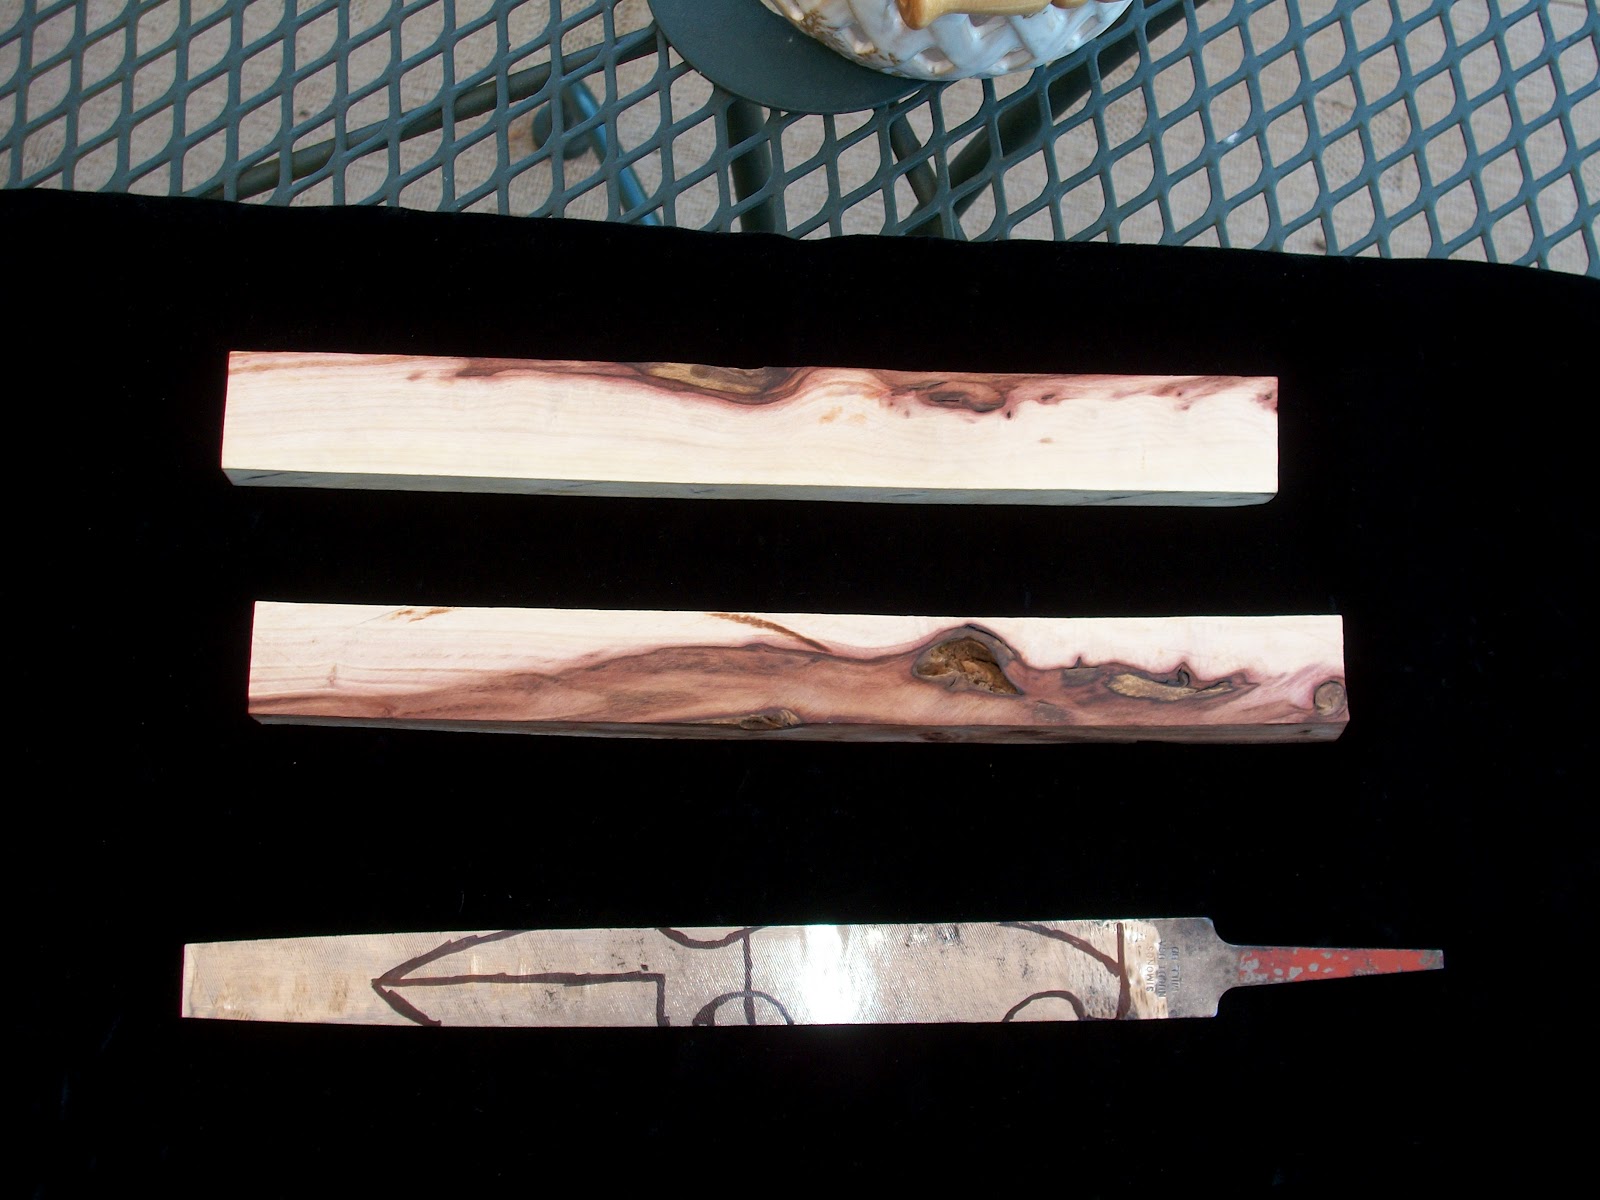
| here they are with the file for some scale |
 |
| Pretty eh? |
These slabs are approximate 1 1/4"wide 5/8" thick and 11" long. This is green wood so it will have to be dried to before using. You can skip this step if your wood is already seasoned and dry.
I set the oven to 215 F and baked the slabs for about 4 hours. I let them sit the sun all day today and will give them another bake tonight. I did a bit of reading on drying wood in a household oven there are folks that say don't some that say its fine some even say to use the microwave almost all said to use a moister meter to determine if the wood is dried completely. As it happens I left my Acme Plasma Drive 40 watt range MeasureTron 2000 Moisture Meter in my other pants so a few cycles in the old oven will have to do.
 |
| end view of the small log I cut the slabs from |
|
| rough cut scales they will need to be shaped after they are pinned and epoxied to the blade |
Like I said earlier I am waiting to finish a few more blades before I set up the forge and do the heat treat so I will post what I have so far and come back with final assembly once that is complete.


No comments:
Post a Comment